How to clean dust from a Ricoh GR III / IIIx sensor or lens
Thanks for stopping by! While you're here, I'd like to mention Eureka, an Android app I built to download photos from your Ricoh GR camera after struggling with Ricoh's official Image Sync app. If that sounds like it could be useful, please give it a try.
I absolutely adore my Ricoh GR camera. It’s small enough to fit in my pants pocket, so it goes everywhere with me. And, as the saying goes, the best camera is the one you have with you.
Unfortunately these cameras tend to be susceptible to dust which can cause artifacts in your images, especially when using narrow apertures (e.g. f/8-f/16.)
Some owners of this camera try to avoid dust entering the camera through the use of lens caps, protective cases, and other accessories, but this makes it difficult to carry the camera in your pocket. Even with careful use of the camera, dust has a habit of sneaking in. Thankfully, it’s neither difficult nor time consuming to remove the dust with the right tools!
Disclaimer
If your camera is under warranty, following this guide may void it. Cameras contain sensitive electronics which can easily be damaged. It is possible to cause irreparable damage to your camera by attempting this repair.
By following this guide you acknowledge that I am in no way responsible for any damage that occurs to your camera. If you are not confident in your repair skills please consider finding a qualified technician to remove the dust for you.
That being said there’s nothing inherently difficult about this process. Pay attention, take photos to remind yourself how everything fits together, and your camera will be dust-free before you know it.
Prerequisites
This process can be completed in approximately 15 minutes once you know how it’s done. Expect your first repair to take about an hour.
You’ll need the following tools:
- PH00 screwdriver
- Rocket blower
- A small flathead screwdriver
- A safe spot to store your screws
- Optional - APS-C sensor cleaning kit
You will be removing screws of different lengths, so it’s a good idea to lay them out in such a way that you’ll remember where they came from. Be sure to use the correct bit (PH00) to avoid stripping screws.
A sensor cleaning kit is usually unnecessary because, unlike an interchangeable lens camera, the sensor is never directly exposed to the elements. However, if your sensor is severely dirty a cleaning kit may help to remove stubborn deposits. In my experience a rocket blower is all you need.
Test Photo
Before you begin, take a photo of a white wall or piece of paper at f/16 with macro mode on. This will make all the dust on the sensor visible, and will help you determine you’ve removed all the dust.
Disassembly
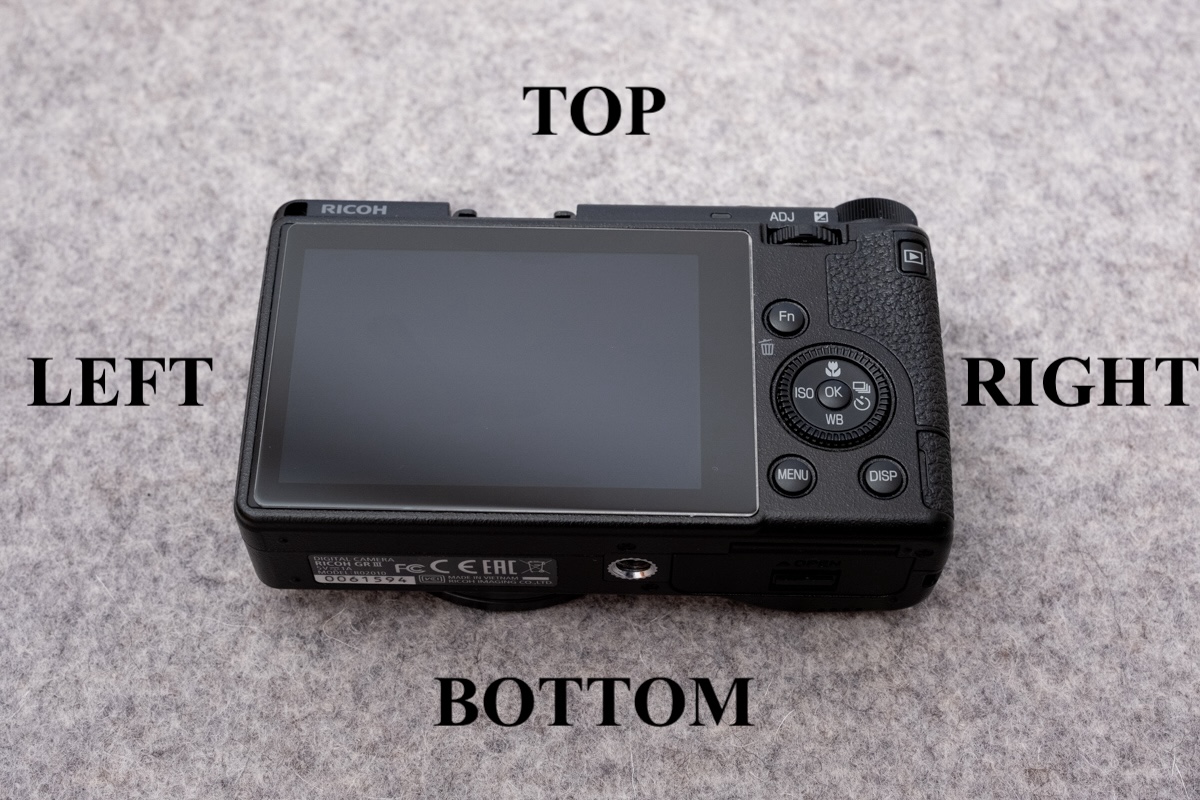
Throughout this guide I will refer to the sides of the camera as if you are holding it in your hands with the LCD screen on the back of the camera visible. Therefore, the movie button is on the left side of the camera, the USB port is on the right side of the camera, the lens is at the front of the camera, the shutter button is on the top of the camera, and so on.
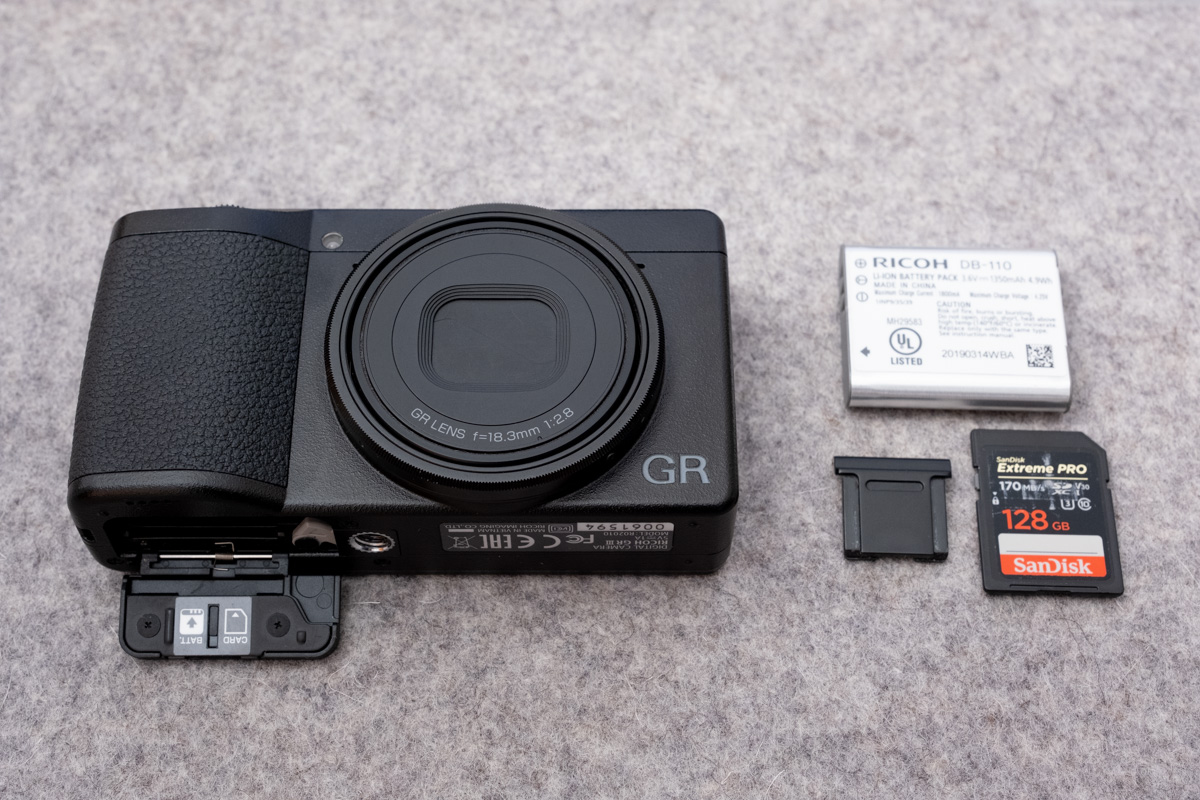
Step 1: Remove any accessories from the camera.
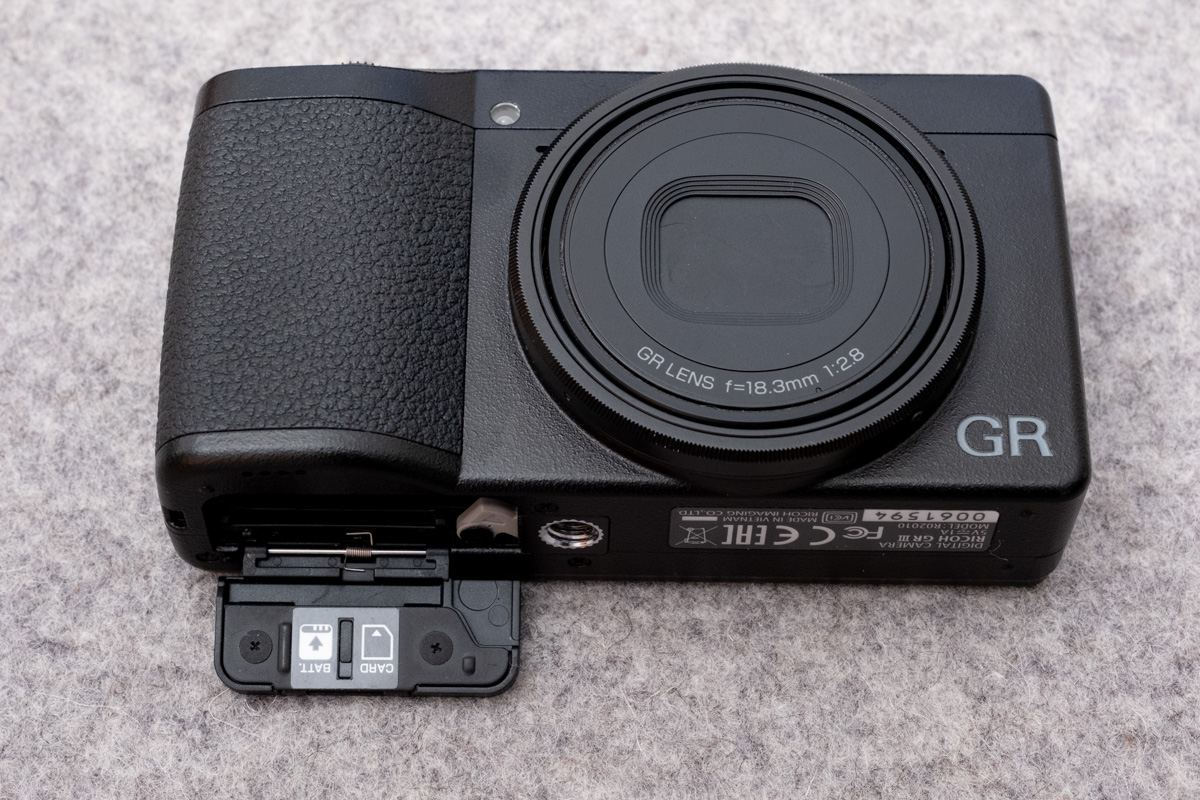
Begin by removing any wrist or neck strap, battery, SD card, and hotshoe cover on the camera.
Step 2: Removing chassis screws
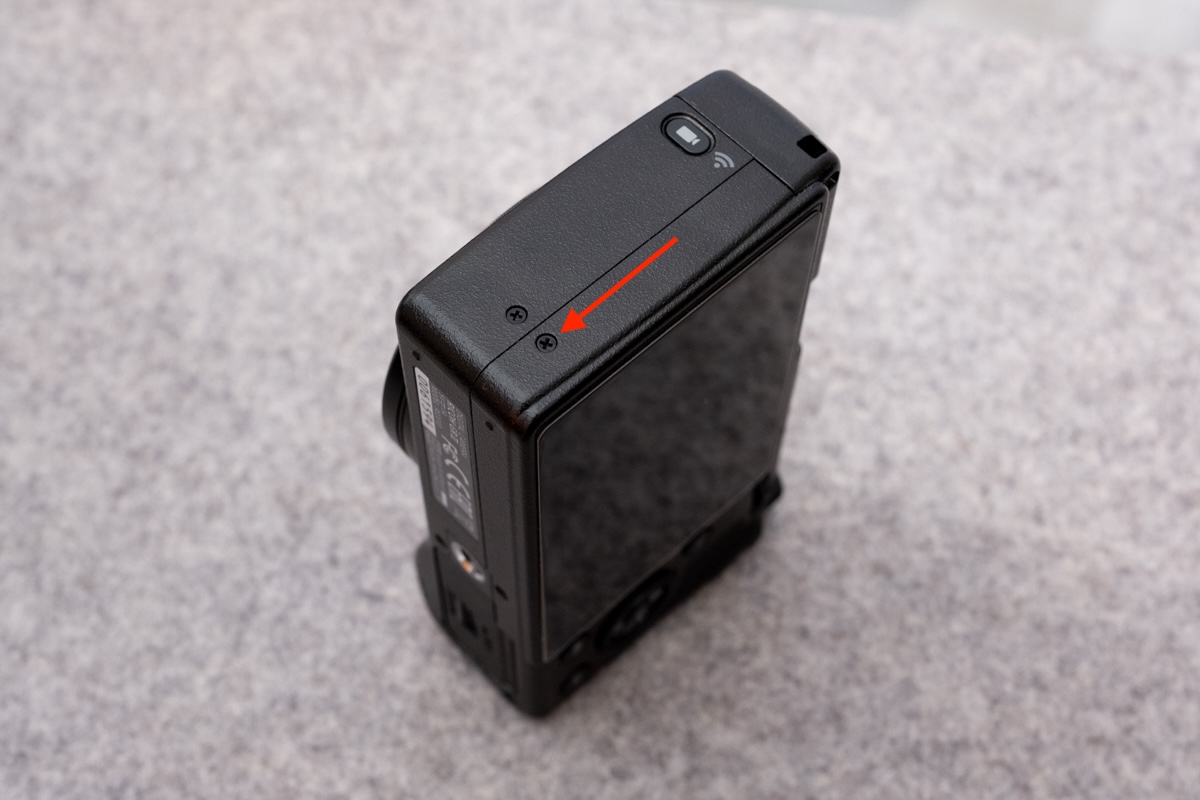
Starting with the left side of the camera, remove the screw located at the bottom right corner (closer to the LCD screen.)
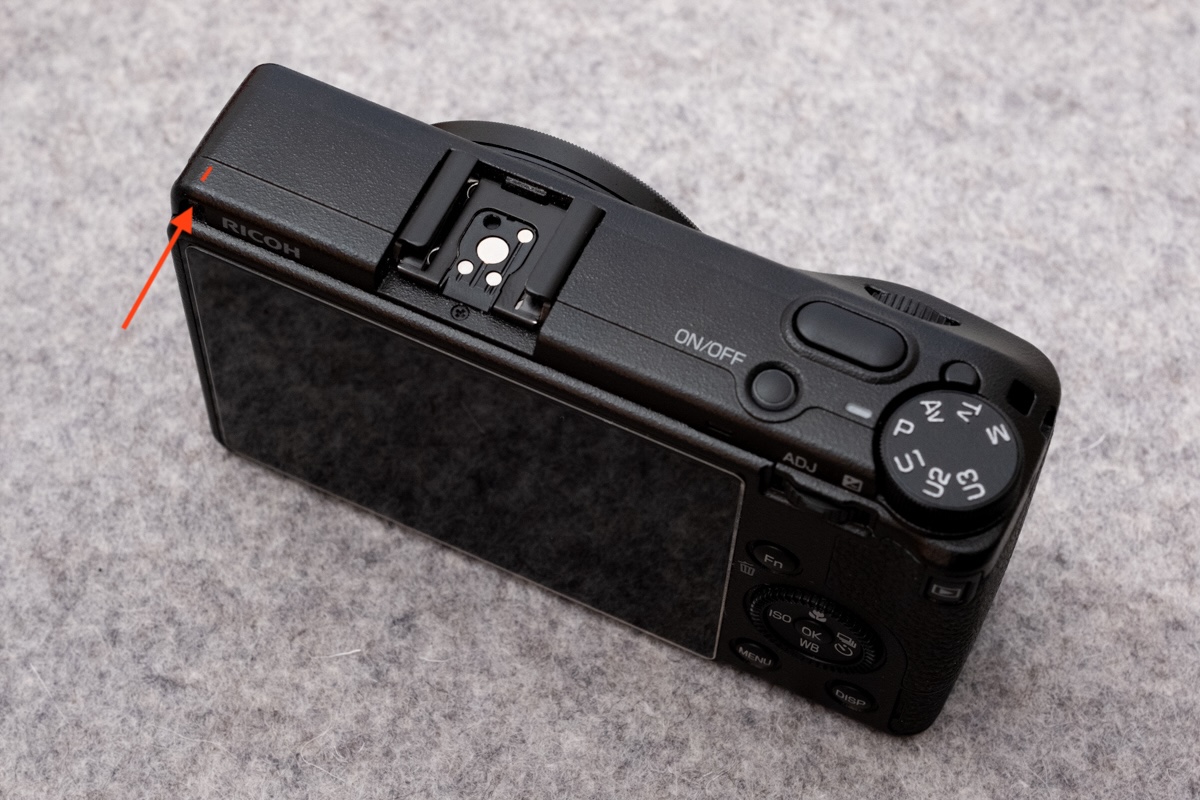
Facing the LCD screen, there is a recessed screw in the upper left corner, next to the “RICOH” text. Remove it.
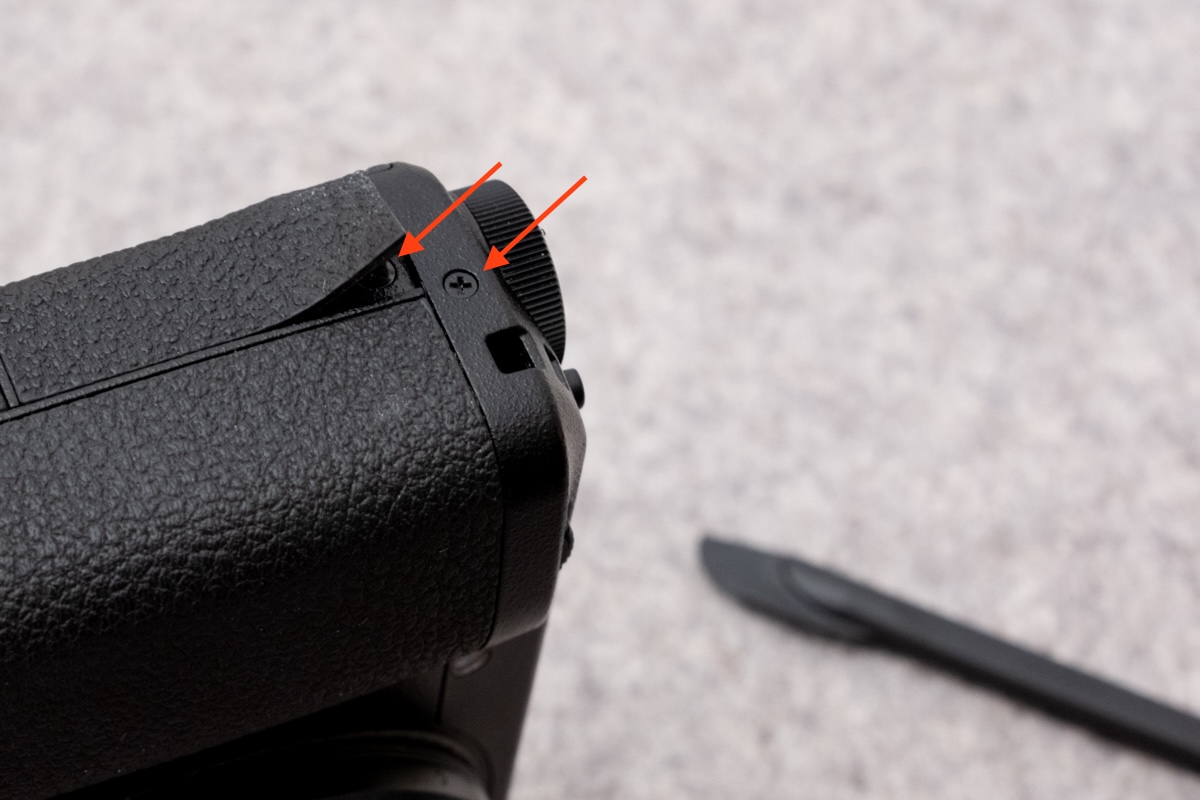
There are two screws to remove from the right side of the camera. The first is located center-top, just left of the wrist strap loop. The second is hidden behind a piece of rubber just below and slightly to the left of the first screw. Peel back the rubber piece which straddles the play/review button starting from the top right corner to reveal it. (It won’t lose its stickiness.)
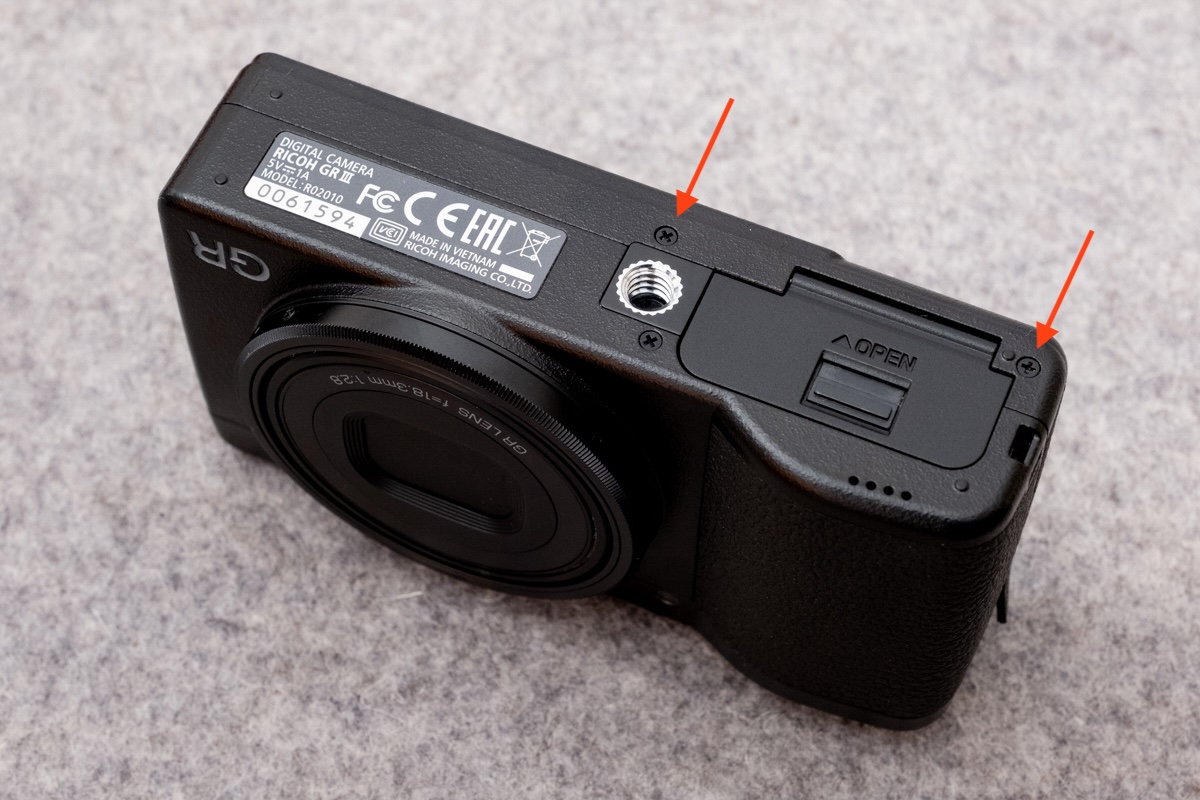
Orient the bottom of the camera so that the writing on the labels is right-side up and remove the two upper screws.
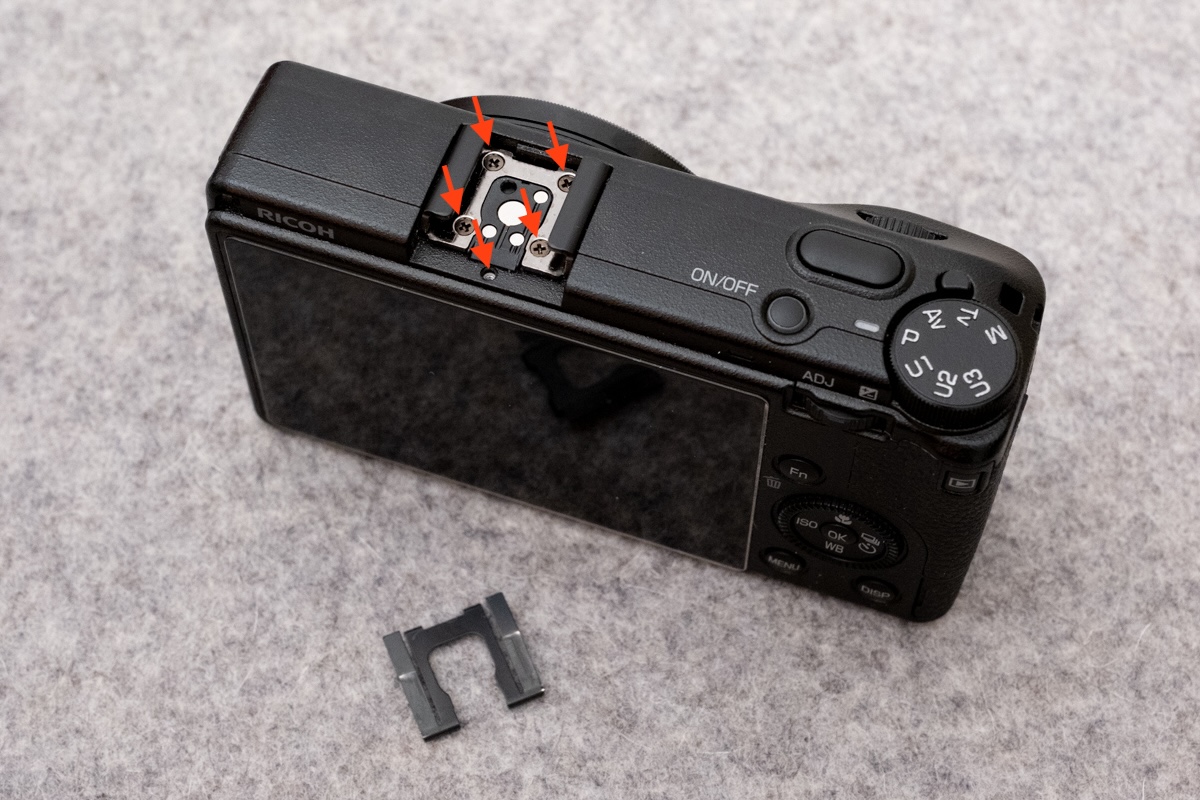
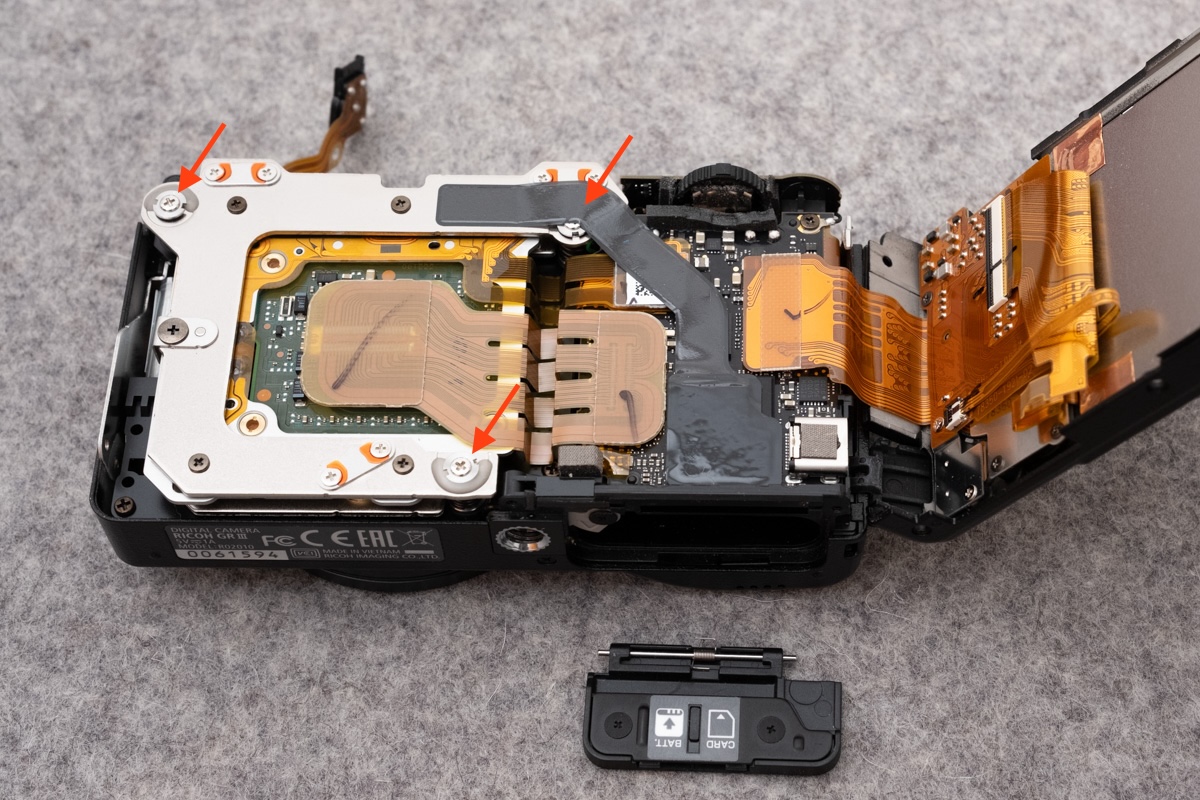
Looking at the top of the camera, remove the screw under the hotshoe. Use a small flathead screwdriver or a spudger tool to pop out the clip from the hotshoe (see image below.) Finally, remove the four screws holding the hotshoe and mount in place, and lift out the hotshoe mount.

Step 3: Opening the chassis
You should now be able to pop the top plate up and off of the camera. Be careful of the hotshoe ribbon cable when doing so.
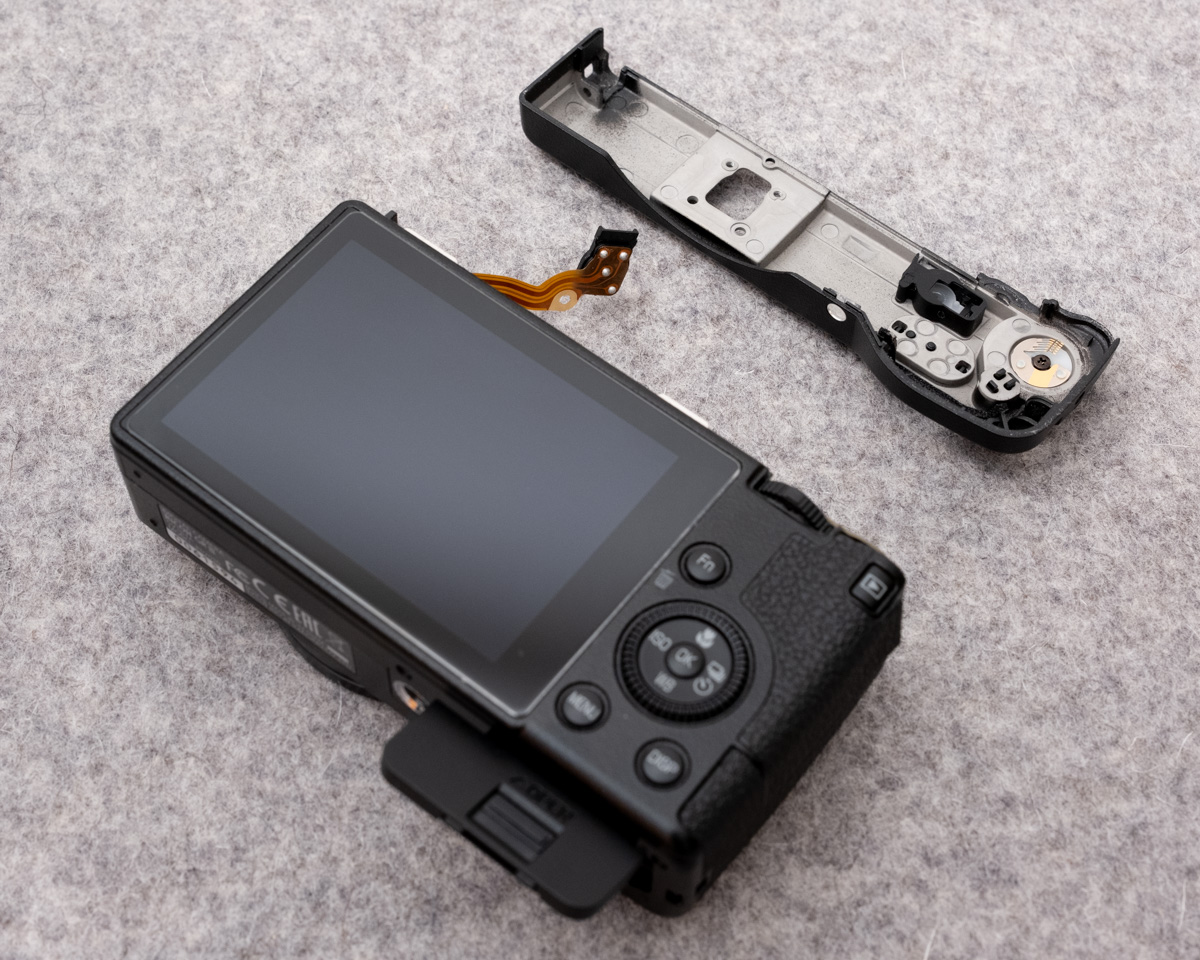
Open the USB charging port flap and, working from the left side of the camera first, gently pry the back case of the camera away from the rest of the chassis. Be careful, as there is a ribbon cable connecting the two pieces (see image below.)
While it is possible to finish this procedure without disconnecting the ribbon cable as I have done in the following images, you may find it safer and easier to disconnect the cable now. Gently pry the ribbon cable connector on the main chassis from the edges to loosen it and then pull straight up to disconnect it.
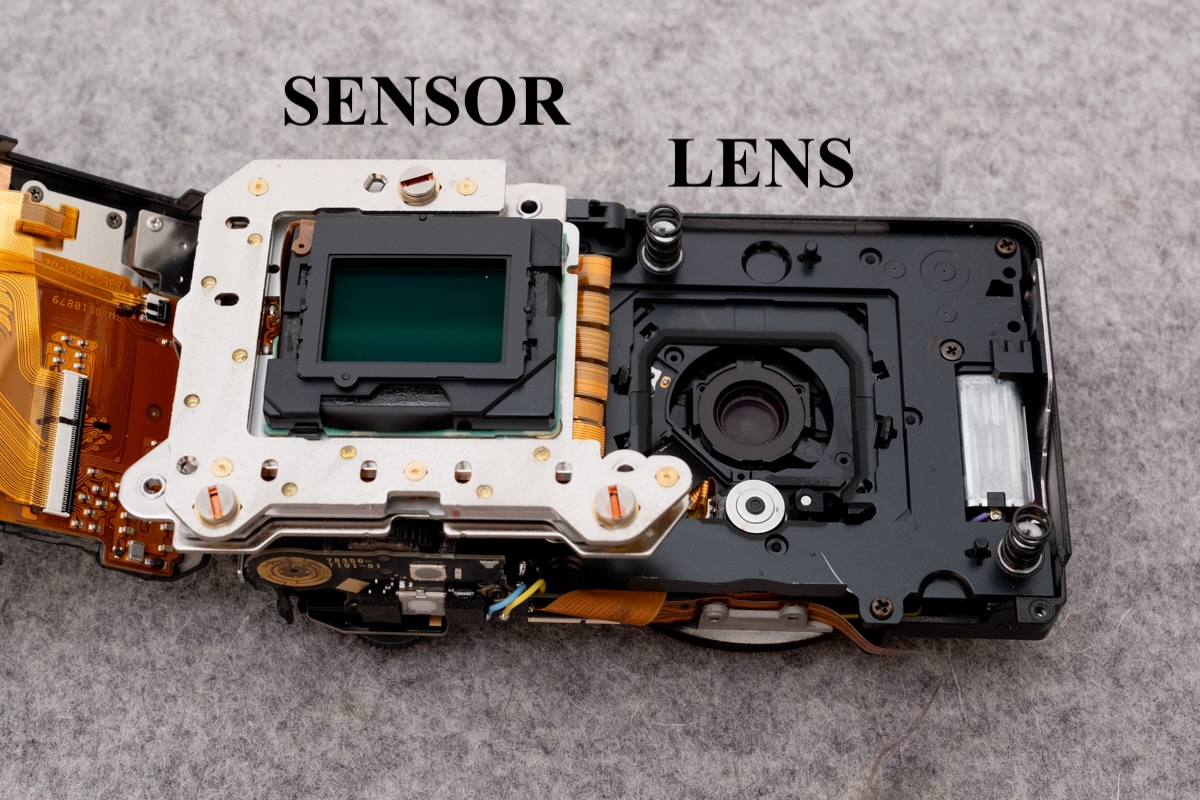
Step 4: Reveal the sensor
Remove the three silver screws holding the sensor mount to the camera body, and flip it over to reveal the sensor. Note the three springs used on each screw - do not lose them!
Now that the sensor is exposed, be very careful not to scratch or damage it in any way!
Cleaning
Warning: Do not use any cleaning products which are not made specifically for cleaning camera sensors! Do not touch the sensor with anything other than a sensor cleaning swab appropriately sized for an APS-C sensor.
With the sensor exposed, use your rocket blower to blast the sensor and lens clean. If you opted to use an APS-C sensor cleaning kit, follow the included instructions.
You can see in the above image that there is a large speck of dust on the sensor near the top right corner. I find the dust is usually on the sensor rather than the lens itself. A few blasts from the rocket blower was enough to remove it and some other smaller pieces of dust.
Reassembly
Carefully re-seat the sensor, ensuring that all three springs are still in place, and reinstall the three silver screws, being mindful of any ribbon cables. Reconnect the display ribbon cable if you disconnected it earlier.
Pull the hotshoe cable through the top plate and seat the hotshoe.
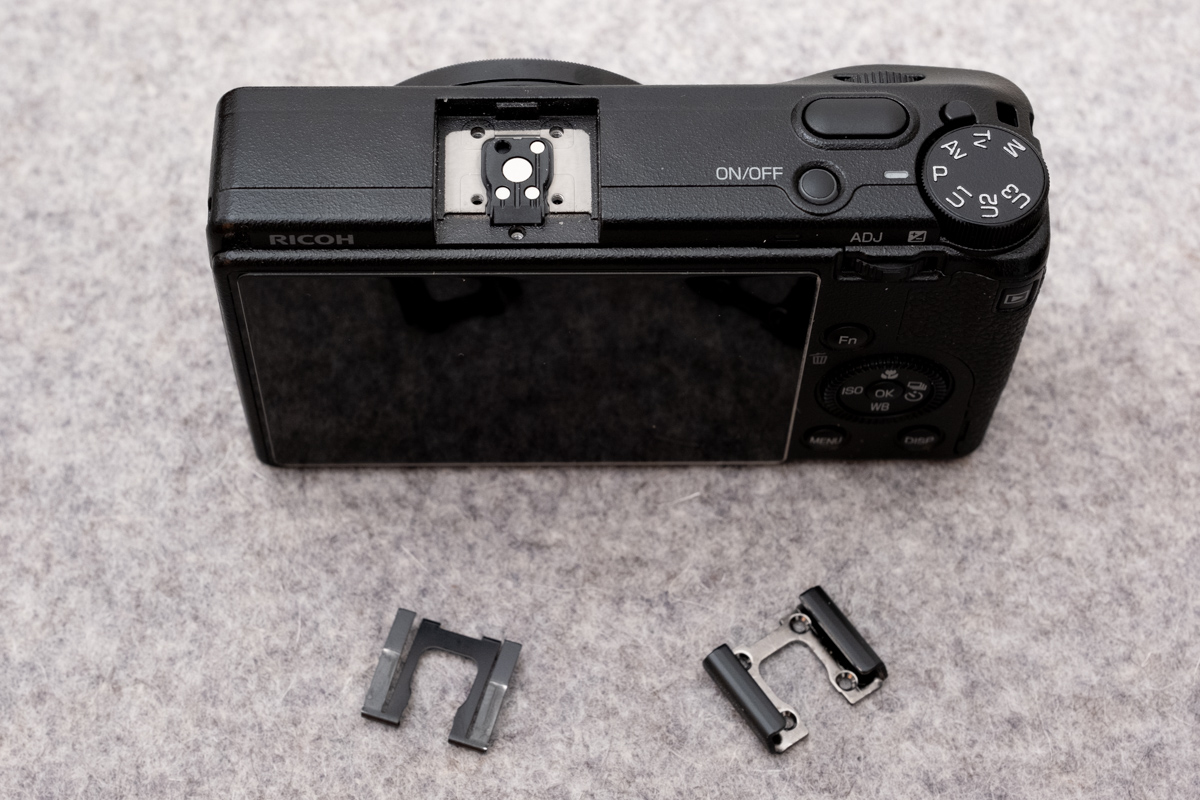
Replace the hotshoe mount and install the four screws you removed earlier (the longer two screws are installed on the front, or lens side, of the camera.) Push the hotshoe clip back into place.
Reinstall the two longer screws on the bottom front of the camera.
Hint: Now is a good time to retake your test photo to ensure all the dust is gone! If the test photo doesn’t show any dust, continue on…
The shortest screw, with the wider head, goes behind the rubber cover near the play/review button. Of the three remaining screws, the medium-length one is installed just above it.
The long screw goes into the recessed hole near the text “RICOH” on the back of the camera.
The final short screw should be reinstalled on the left side of the camera.
With all the screws back in place, make sure that the battery door swings open on its own when the toggle is switched to “OPEN”. The battery door spring can be maneuvered into the correct position using a small flathead screwdriver or a pick.
Congrats, you’re all done! Enjoy your Ricoh GR!
Acknowledgements
I learned how to perform this repair by watching this video by DIGI SERVICE on YouTube. However, the video includes some unnecessary steps, and I personally prefer text/photo tutorials to video tutorials, so I wrote one. I hope it helps!
P.S. If you have a Ricoh GR II, the process is very similar. Jamie Collinson’s guide is a great resource.